 |
| See setup shot below |
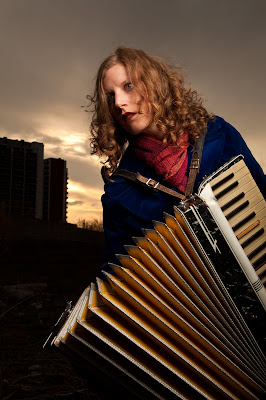
I've been scouting for a location for a project next weekend and came across the vacant lot you see above. I asked Cristy if she would come out and model with a prop. She chose the accordion - awesome choice....
I'm using speedlights, so...I can't overpower the sun in the middle of the day out in the open. Around sunset I'm in business and on those nights when there are some clouds in the sky, I get excited.
Mixing Ambient and Artificial Light - part II
 |
| Test shot for ambient light in the environment |

In the picture on the above, you're seeing the scene exposed more or less "properly" with the help of my 28" softbox. The buildings in the background really don't represent Toronto's finest architecture and there isn't a lot of detail in the clouds. To bring out that drama, increase your shutter speed to make the scene darker and bring out the colour and detail of the sky. David Hobby, "The Strobist" calls this "the drama button" with good reason.
The next thing to do is to see what aperture setting that leaves you with. In the above scene, it's still relatively bright as we're shooting into the direction of the sun. This means I have to close my aperture down to get the shutter speed to sync with my lights. The shots at the top were taken at 1/250 sec, f/9, ISO 100 and still my speedlight was at full power a few feet from my subject. And since I had my light in the softbox, I know I'm losing more than a stop of light.
Now that the exposure is set, it's time to compose your shot.
Some important take-aways from Zack's workshop:
"Head in a clean spot" - I wonder how many times he actually said that over the course of the workshop. It was enough to understand that it's important, so even though I already generally try to be aware of things growing out of heads like tree branches and so on, I was really trying to be ultra-aware of that.
"Eyes to the light" was maybe the second-most repeated phrase. Without having someone look directly into the light, it keeps the eyes bright and gives you some pleasing catch light.
Funny - as soon as I knelt down on one knee Cristy was immediately worried. Everybody knows you don't shoot up at people - especially women or you get a thick, unflattering neck. Zack's solution: have your light source just above the person's head to create some shadow and shape the jaw line. Works great! Also, shooting up like this helps with "head in a clean spot".
Having the light chase the lens - Zack talked a lot about this. The idea is to have your light source above your camera. If you're shooting without sandbags or an assistant, put your foot on the bottom of your lightstand - mine almost went over a couple of times....
Another setup we tried was lighting the background and the subject with the same light source. I ran into some trouble with the darker green paint as it was more reflective and came out too bright. I had to try and work with that in post even after trying to reposition my light. Finally the solution was to find a part of the green wall without the darker paint on it, which worked out much better. Again, "eyes to the light".
Our cherry blossoms in Toronto are coming out a little late this year - I'd really love to get out this week and try out some more of this type of portraiture with a cherry blossom-filled background if anyone's willing to sacrifice themselves for an hour or so - wish me luck!
...and as in this previous episode, watch for the model snatching your camera away from you to leave you standing there with an accordion like this:


8 comments:
Informative post! I like the tips, especially: "Head in a clean spot" and "eyes to the lights". Thanks for sharing and I look forward to your next post
Thanks Miguel!
Just watched the first 2 posted (free preview videos) from Zack Arias. Looks like a great investment for only $150!
Thanks for leading me to Zack Arias :D He's amazing and I've already learned tons of stuff from him in the last couple of days :D
@lv1nX Glad to help - Zack is amazing....
shayne gray learns photography
Nice work! Gorgeous photo.
On the rooftop during the workshop Zack kept saying he was waiting for the sky to get to f/4... What exactly did he mean by that? Like, f/4 when at ISO 100 + 1/100th?
@Joseph - exactly. I think Zack was using a shutter speed around 1/150, but close enough.
That was a great session on the roof - too bad the tethering didn't work out.
Thanks for stopping by....
Wow. awesome blog! Zack is an awesome teacher. He has done two 3 day free online workshops on Creativelive.com. This is an awesome source free online workshops.
Post a Comment