 |
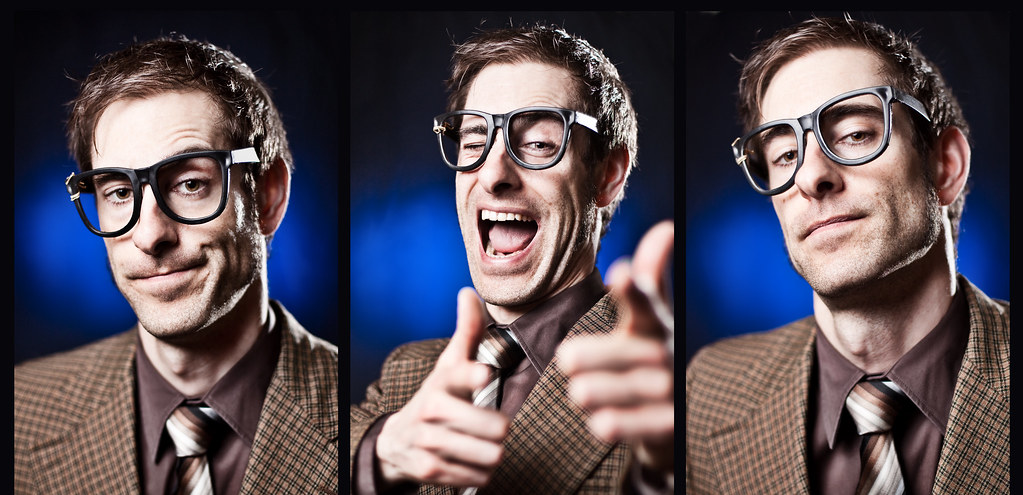
| The Sceptic The Game Show Host The Over-Confident |
Andrew Wong (aka One Drop) has some great series of really dramatic situations that he's used his lighting and processing to enhance. He was nice enough to send me a link to get me started. You can get there either on Scott Kelby's blog or directly from Dustin Snipes' blog.
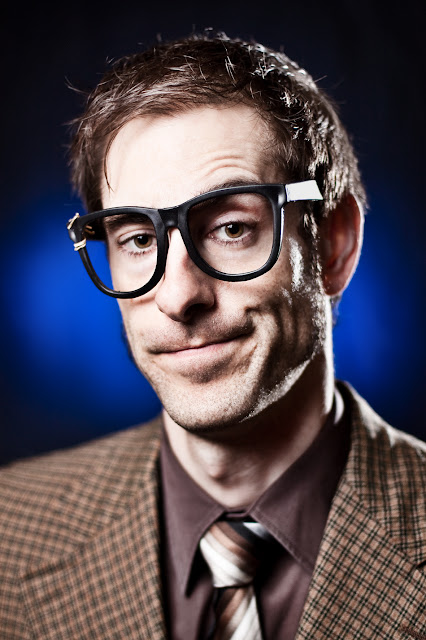
I've played around with this technique before, but never really lit a situation specifically to process this way. I have to say...I think it's pretty cool....
You can read the article yourself and there are other places to find similar techniques, but just to add a little to it, I thought I'd point out a couple of things.
 Lighting
Generally there are kicker lights involved (from behind to highlight edges). I only had one kicker (snooted) at about 45° behind me to light up that side camera right, though many use one on each side. You can see another on the background with this cool gel system directly behind me pointed at my 5-in-1 reflector kit that made for a nice (but small) black background. My third light that was used as my key or main light was in a softbox
 only a couple feet away camera left and slightly above.
I've got a few speedlights (no big studio lights) and as a quick note, I just got a Nikon SB-26, which works as an optical slave and I can't say enough good things about it - it's cheap, the sensor is sensitive and I don't need to mess around with another radio trigger! Check out the Strobist's review here.
You'll see that the depth of field in these shots is quite shallow - I used my 50mm 1.4 prime fairly wide open at either 1.8 or f2 because I noticed the black material on my background was very wrinkled. So instead of ironing it, I decided to blur it instead - and this is how you can iron out any material until it's smooth with your camera! And besides that I kind of like the eyes and stubble tack sharp and quick fall-off into blurred shoulders etc.
 Processing
Back in Photoshop you can process your photos as you normally would for contrast and so on. Then duplicate your original layer (control/command J or drag the layer down to the 'new layer' icon in the bottom tray) and desaturate the layer (control/command alt shift U) and apply a "high pass filter" (under the filter menu -->other-->high pass) and change the blend mode to soft light. You can experiment with some of the other contrast modes - overlay, hard light, etc. to see if you like that any better. Dustin says to apply the high pass between 100 - 200. I used 150 and found that worked well. You might as well overshoot and have the possibility of dialling down the effect later with your opacity slider. Note that you're boosting contrast more than you're actually sharpening and that anything darker than 50% grey will go even darker and anything lighter than 50% grey will go even brighter. Watch out for the eyes - if the colour in the iris disappears, you may want to mask that layer off to get that back (more on masking here).
Now create a new layer and switch the blend mode to soft light and call it "highlights". Dustin suggests using a brush at 5%, but again - if you decide you want more later...you won't be able to. I used my brush at 20% and toned it back later. Now with a white paint brush in varying sizes to suit the parts of your image, paint over the highlights. You may find that you want to paint over some areas more than once to make them really come through, but be careful not to go too crazy - my images are fairly hot, but nothing has clipped. In other words, all the detail is still there - there are no highlights that reach 255-white! There are some highlights that I didn't really want to have any brighter, which I left alone. Other areas on the clothes, hair and face I really did want to add more contrast to. Experiment a little.
I created a second layer for my shadows and called it just that..."shadows" and did the same thing with a 20% black brush. I'm glad it was on a second layer because I had more control later and backed off with the shadows more than with the highlights. You can also try changing the blend mode to overlay for even more pop.
 Finishing
I didn't have a lot of red or anything else to tone down like Dustin did, so I simply ignored that step. One thing that I think is important is to give the image a final sharpening. As I mentioned earlier, our high pass added contrast and not sharpening per se - although using the high pass filter is one of the many main methods for sharpening. Sharpening is a bit of a contentious topic, but do what you think looks good. Also be aware that default settings in Camera Raw will add a little bit of sharpening when you import your image into photoshop.
Highlight both your original layer and your high pass layer and flatten & duplicate (control/command alt shift E) and label this layer "sharpening". I wanted to get the sharp areas of the eyes, stubble and hair really sharp and applied an unsharp mask (under filter-->sharpening-->unsharp mask) and applied about 100% sharpening at a radius of 1 pixel and a threshold of 4 so as not to apply it to the blurry areas.
Here's some before and after just to show the basic effect:
Here's how your basic layer setup should look:

...and one final goofy outtake (aw hell...they're all goofy outtakes really):
 As alway, try it yourself and send me a link!
I've played around with this technique before, but never really lit a situation specifically to process this way. I have to say...I think it's pretty cool....
You can read the article yourself and there are other places to find similar techniques, but just to add a little to it, I thought I'd point out a couple of things.
 Lighting
Generally there are kicker lights involved (from behind to highlight edges). I only had one kicker (snooted) at about 45° behind me to light up that side camera right, though many use one on each side. You can see another on the background with this cool gel system directly behind me pointed at my 5-in-1 reflector kit
I've got a few speedlights (no big studio lights) and as a quick note, I just got a Nikon SB-26, which works as an optical slave and I can't say enough good things about it - it's cheap, the sensor is sensitive and I don't need to mess around with another radio trigger! Check out the Strobist's review here.
You'll see that the depth of field in these shots is quite shallow - I used my 50mm 1.4 prime

Back in Photoshop you can process your photos as you normally would for contrast and so on. Then duplicate your original layer (control/command J or drag the layer down to the 'new layer' icon in the bottom tray) and desaturate the layer (control/command alt shift U) and apply a "high pass filter" (under the filter menu -->other-->high pass) and change the blend mode to soft light. You can experiment with some of the other contrast modes - overlay, hard light, etc. to see if you like that any better. Dustin says to apply the high pass between 100 - 200. I used 150 and found that worked well. You might as well overshoot and have the possibility of dialling down the effect later with your opacity slider. Note that you're boosting contrast more than you're actually sharpening and that anything darker than 50% grey will go even darker and anything lighter than 50% grey will go even brighter. Watch out for the eyes - if the colour in the iris disappears, you may want to mask that layer off to get that back (more on masking here).
Now create a new layer and switch the blend mode to soft light and call it "highlights". Dustin suggests using a brush at 5%, but again - if you decide you want more later...you won't be able to. I used my brush at 20% and toned it back later. Now with a white paint brush in varying sizes to suit the parts of your image, paint over the highlights. You may find that you want to paint over some areas more than once to make them really come through, but be careful not to go too crazy - my images are fairly hot, but nothing has clipped. In other words, all the detail is still there - there are no highlights that reach 255-white! There are some highlights that I didn't really want to have any brighter, which I left alone. Other areas on the clothes, hair and face I really did want to add more contrast to. Experiment a little.
I created a second layer for my shadows and called it just that..."shadows" and did the same thing with a 20% black brush. I'm glad it was on a second layer because I had more control later and backed off with the shadows more than with the highlights. You can also try changing the blend mode to overlay for even more pop.
 Finishing
I didn't have a lot of red or anything else to tone down like Dustin did, so I simply ignored that step. One thing that I think is important is to give the image a final sharpening. As I mentioned earlier, our high pass added contrast and not sharpening per se - although using the high pass filter is one of the many main methods for sharpening. Sharpening is a bit of a contentious topic, but do what you think looks good. Also be aware that default settings in Camera Raw will add a little bit of sharpening when you import your image into photoshop.
Highlight both your original layer and your high pass layer and flatten & duplicate (control/command alt shift E) and label this layer "sharpening". I wanted to get the sharp areas of the eyes, stubble and hair really sharp and applied an unsharp mask (under filter-->sharpening-->unsharp mask) and applied about 100% sharpening at a radius of 1 pixel and a threshold of 4 so as not to apply it to the blurry areas.
Here's some before and after just to show the basic effect:
 |
| Before After |


2 comments:
awesome tutorial! Do you know of similar steps that can be done to get a similar effect in LR? I can imagine playing a bit with the contrast and clarity.
Thanks Miguel - you can get some of the effect in LR. Part of the contrast comes from using a sharpening method as a contrast tool. You could use something like an unsharp mask, for example, with the radius pushed much higher than you would use it for sharpening. The thing that you really need something like photoshop for is the burning and dodging on specific parts of your image.
Good luck!
Post a Comment