I've been reading about wire wool spinning for a while now and even bought the necessary materials to give it a try some time ago, but...then the weather took a turn for the worst and...it's just not fun to be at the water in weather like we've been having lately. Finally it let up just for a couple of days and it was time!
I convinced my girlfriend to get bundled up and come out to help operate the camera (to my surprise, it was much less of a struggle than I'd anticipated).
Get the Know-How Online:
One thing I noticed right away in all my reading is that there is lots of information out there that a lot of good people have made available. On Flickr you'll find amazing pictures from people who have been at it for some time and are quite willing to share their wisdom. I've been quite impressed at how supportive people generally are in some of those Flickr light painting circles.
I started with a fairly straightforward "light junkies" tutorial here from readwrite. And after you've read that post, google "wire wool spinning" and check out the amazing things people are doing! As I mentioned, there are a ton of great images already on Flickr - many of them have commented on the post, so click on their thumbnails and check out their galleries as well.
It's amazing how little you need to get you going - here's what I took with:

- my super handy Lowepro Slingshot 200 AW
bag
- Tokina 11-16mm f/2.8
- Canon 50mm f/1.4
(didn't actually wind up taking it in the end - still a really great lens though!)
- steel cutters (although wire snippers would have also been fine - not essential, but good to cut the wool if you need to)
- steel wool
! (less than $2 here
- Canon 580 EX
flash just in case - didn't get used, but can be cool for light painting....
- pliers to bend the coat hanger I was using (and to fix my bike on the way to the water)
- bag strap with hook clip end
- coat hanger
- compact Canon bag, which I was sorry I didn't take because it had my extra camera battery in it....
11. my camera (Canon T1i
12. hot cocoa and home-made cookies that my girlfriend baked and packed up for us.
13. flash light(s) to help you autofocus
14. lighter/9 volt battery (to light the wool on fire - tap the polls of the battery against the wool)
15. warm and sensible protective clothes!
In the tutorial, "readwrite" says he uses a chain and ties the wool to it. I didn't have a chain lying around and went with some kind of an old bag strap with a clip hook on it. I cut some coat hanger and bent it into a loop and tied the wool to it like this:

One solution to that problem that I've read is to get pliable copper wire and make some kind of a cage out of it to keep everything intact (more on this during my second attempt - half way down the page or so).
Now we're ready to head outside and give it a go!
Camera Settings:
Set your camera to full manual mode - "M" on most cameras. I found that a lot of people set their ISO to 100 (maybe 200), which makes sense because you're going to leave the shutter open for a while and it keeps the quality high. Set your aperture to something with good depth of field - somewhere between f/5.6 - f/8 or so should still let in enough light and keep things well in focus. It's a good idea to take a second person though, I suppose, not essential. Set your shutter to "bulb" so that your accomplice (or you) can close the shutter when your spin is complete. Alternatively you could set a 10-second timer and set your shutter to stay open for 30 seconds or so, although it can be tricky to get the wire wool lit in the wind. A remote shutter release
Send your helper into the scene where you plan on standing and have them illuminate themselves with the flashlight to help you autofocus - then set to manual focus and don't touch anything!
I tried an exposure before actually lighting anything on fire just to see how the camera would view the scene first:
 |
| ISO 100 f/5.6 @ 30 seconds |
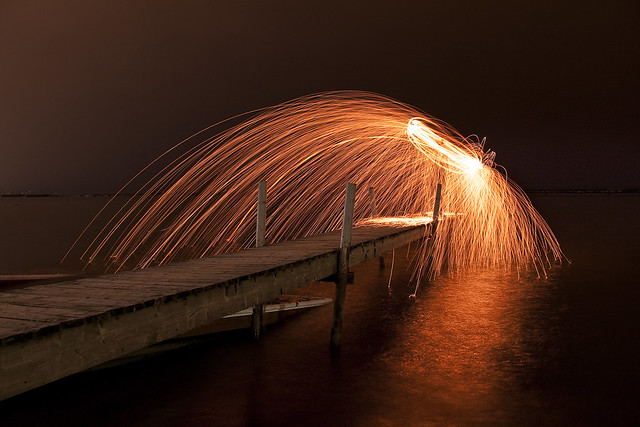
You'll notice the dock is a bit darker in the same scene below with the spun wire wool. Some say to go ahead and close the shutter when your burn is done, although next time I think I'm going to experiment leaving the shutter open a little longer to expose for the rest of the surroundings.
 |
| ISO 100 f/5.6 @ 18 seconds |
When you're processing, you can play around with your white balance to get it the way you want. "Tungsten" will give you whiter streaks, for example, and "shade" will give you more yellow. Experiment and see what looks good.
I can see how this can easily become addictive - it's fun!
Safety:
Be smart - don't wear anything too flammable and try and go out maybe with less hairspray that day. Even better...put a hat on. My girlfriend told me that a giant spark had landed on the back of my jacket on the inside of the neck part. I wouldn't have noticed had she not been there, so perhaps a second person really is a good idea to have....

So now you're really to go off and try it yourself! I'd love to see what others come up with and hear about what they've done differently, so send me your work!

 Other streams to check out (this is how the pros do it):
Jules by Night
Biskitboy
dannotti
tackyshack
Wes Whaley
Dennis Calvert
...and so many more....
All right! Off to Vancouver in the morning - if you're around let me know and we'll go for a coffee (or something harder...).
Oops! Have I missed something?! Help share resources by adding them with a short description in the comments section or write me and I'll make sure it gets on there!
5 comments:
thanks for the shout out bro. thank you very much!
i would love to get together and shoot one day!
Wes Whaley
hit me up on flickr soon!
You bet! All the very best of the New Year - looking forward to seeing more!
Very nice sharing and tips. Will try this out someday =) Thanks again :)
Would a wire whisk that we use in the kitchen, for us cooks, work well here? Could insert the steel wool then attach the wire on the end handle. Would this work?
Hey Dee,
I think you'd have to make sure that it's further down in the whisk where it starts to get a little narrower. If the spaces are too big, you might find it just flies right out - guess it really depends on the whisk though! For a master chef like yourself, perhaps you'd more comfortable slinging a whisk around with some wool on fire....
Try it - and don't forget to send me the pictures after!
Post a Comment