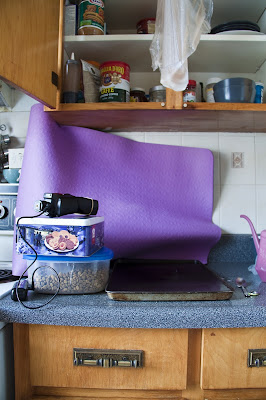
And so in the name of experimentation and learning, I set out to try and get some of my own water drop shots. I learned a lot in the process and realized there is a lot more to it that I would (/will) do next time. So...read this first and your first attempt will be even better!
Almost directly after I'd taken my shots and packed up the gear/splash zone, I stumbled on a couple of really great resources for doing exactly this kind of photography. This one is definitely worth a peek. It's the guide book you'll be using if you want to really get into the nitty gritty of how to do it with very controlled results - as much as you can control with the randomness of water drops.
Also worth a look is Corrie White's website and her fun with water set on Flickr - beautiful and interesting work.
Setup and Colours
Before you go any further, make sure you have a couple necessary pieces of equipment: a tripod and (perhaps more importantly) a towel - and a remote shutter release would be useful as well although not essential.
I started off with the idea that I wanted colours to reflect and got some brightly coloured cereal, rice & tin foil boxes out to put behind my water tray (girlfriend's cookie sheet - use something a bit deeper though like a paint tray or something). The colours were very nice:
...but...you can see the printing from those boxes in the images, which is great if you're going for that.
Setup here:
 |
| Setup shot with product materials with hopes they would add colour to the water's reflection. Here the water bag is also too low. |
 |
| Simple clamp to keep the water bag in place |
And when you're ready, poke a hole in the bottom and get ready to take some beautiful pictures!
No...wait...we haven't looked at how to set the camera yet...and first you'll need to focus. Use a spoon, pen, whatever is close and put it where your drops fall - focus and then switch over to manual focus.
| With multi-coloured backsplash (hodge-podge) |
I shot the whole series using my fastest sync speed with my cybersync radio triggers, which is 1/250 sec. which you might assume would be the way to go. The flash was set to 1/4 or 1/8 power or so, which I thought I needed to keep the 100 ISO quality that I wanted with my aperture set to f8.
Corrie actually says that she leaves the shutter open for 0.5 sec and keeps her flash powered down to 1/32 or 1/64 with her ISO at 100! Regrettably I only read all that after finishing my experiment, but the way she explains it actually makes sense.... It turns out it's the low power that gives you such a short burst of light, which freezes the action - at a higher shutter speed and more light she said she found she was getting some motion blur. With such low power and longer shutter speeds, you obviously won't be working in your kitchen just past noon like I was either.
I also found that f8 wasn't quite enough in many shots to keep everything in focus - or at least the parts I wanted. And sure enough she recommends f10 - f14. I also learned that I probably shouldn't have been so close to the action either, which made the depth of field relatively shallow despite my f8 setting. Move back, zoom in and crop later in post.
Post Production
 |
| Basic Settings inside Camera Raw |
 |
| Split Toning settings inside Camera Raw |
What might ordinarily be a levels adjustment in Photoshop, I used Camera Raw to push the brightness and exposure to brighten the highlights and then brought up the "black" slider to give the image more contrast and was fairly aggressive with it in some cases. I also pushed up the vibrance, which is a lot like the saturation slider, but not totally the same. And after adding some additional sharpening - nothing too crazy - that was that! Each one was processed slightly differently, of course, but from the screen capture of the slider settings on the left, you get the idea.
For the shots with the purple background - which was just my girlfriend's yoga matt tucked in behind the water tray - I used some split toning again in Camera Raw. I find it a nice effect, but you can play with that until you get it just the way you want it.
And now you're well-equipped to try it yourself if you haven't already! Give it a go and let me know how it turns out!

Final Setup
Oops! Have I missed something?! Help share resources by adding them with a short description in the comments section or write me and I'll make sure it gets posted!

0 comments:
Post a Comment