Photo Manipulation:
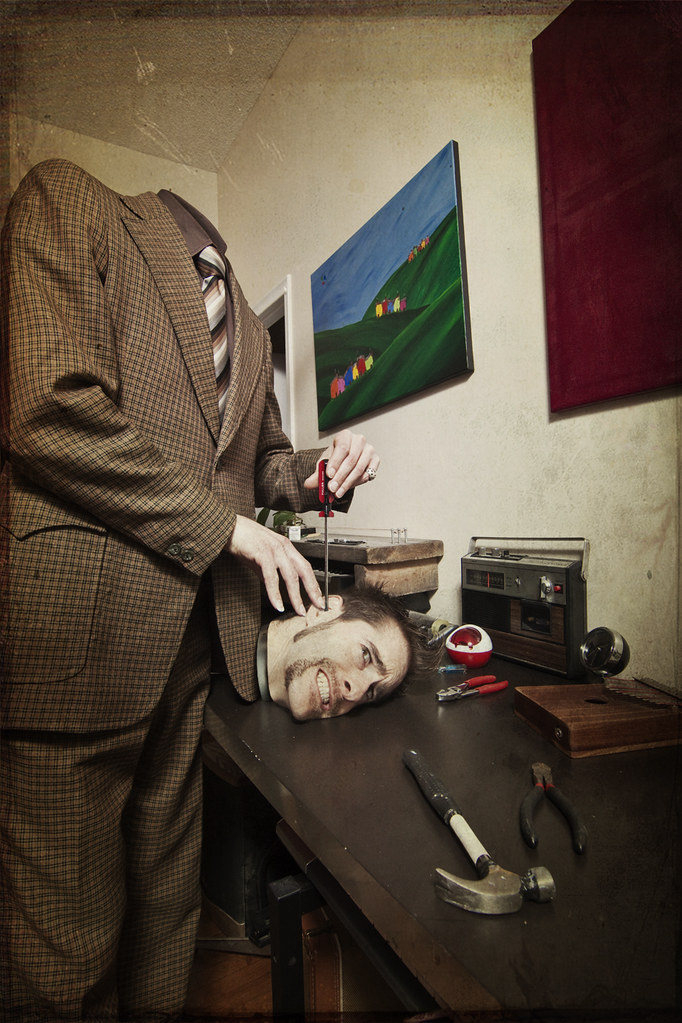
It's fun to think up silly, ridiculous and otherwise impossible situations, don't cha think? We, of course, had to do something with the moustache just before shaving it off - and what better way to create ridiculous hilarity than with a trailer park/trailer trash 'stache and a vintage Herb Tarlek suit to get the mood just right?!
Taking the pictures
The idea here is very similar to the Matrix Restrung post. I prefer to do as little photoshopping as possible - meaning that I always find it easier (and therefore more convincing in the end) to take pictures that save me work later on. I used a boom stand to tie a piece of string that would hang into my ear as I had my head on the desk. Then Cristy, my faithful assistant, swung the string over the boom out of the way. Then we used the string again to show me where I had to hold the screwdriver to get it so that it would be in exactly the same position as my ear in the picture before. I have to say...the placement using the string worked out perfectly. Just don't forget to use a tripod and set your camera to full manual so that all exposures are exactly the same!
Please excuse the fact that I have my shirt off here, but I wanted to have as much neck showing as possible to work with.
Processing
In Photoshop I used the shirtless picture as the very bottom layer. Then I put the picture of me standing with the screwdriver on top of that bottom layer and masked away the areas that I wanted to show through to the shirtless guy (for more on masking, go to the Matrix post). You can see in the picture on the right what I've masked off - you'll notice there's an area in front of where my face is on the desk that I also masked because of the reflection on the surface of the desk. It's very easy to forget reflections and shadows!
Since I've masked away the head, there's a little bit of the collar we need to reconstruct. All you really have to do is make a selection around a little bit of the existing collar, paste it and move it into position. Then use the 'free transform' tool (command/control T) to bend it into shape. And because it should look like it's darker on the inside, I used an 'exposure' adjustment layer to bring the exposure down. Then I used a soft brush over the layer mask to mask away the top part, which should be the same brightness as the other side. Because the brush is set to 0% hardness, it applies a small gradient. Realistically there are many ways to do the collar, but this way got the job done easily.
The next thing were the shadows from the fingers on the head and ear. You can either grab a soft dark paintbrush and paint in your shadows on a separate layer then scale back the opacity or use the eyedropper tool to sample some real shadow colour from the shadow side of the face.
Initially I wasn't sure what to use on the bottom of the neck, but after long deliberation and scrounging around at home, I decided to go with a steel ring.
Without trying to point out all my mistakes, I wasn't very careful to consider where my light source was coming from when photographing the steel ring. I hand-held it simply by the window. In the pictures of our two dudes, the light is coming from above (one shoot-through umbrella). Oh well - yours will be at least one step ahead of mine!
Anyway...import the ring (or whatever object) into the project and resize with the 'transform' tool (command/control T). Again the ring needs shadows - especially on the suit jacket that it looks very close to. If I were to do it all over again, honestly I would probably leave myself more room between the head and the standing me so's not to have to worry about shadows like that. What is important in any case is that reflection again as mentioned earlier. Since there's a little bit of a dull reflection of my face on the surface of the desk, it also has to show the ring as well. Even if it's a very small and hardly noticeable detail, it really has to be done. Your brain will recognize that it's there to help with the illusion even if your eye doesn't necessarily pick up on it.
I copied the ring layer (command/control J) and flipped it vertically (edit-->transform-->vertical flip) and moved it into position. I free transformed it to make it a little straighter and longer then masked away the part furthest from my neck with a large, soft black paint brush again to add that smooth gradient. I initially added a gradient to the layer mask but just had more control with the brush in the end. Then I applied a blur filter (filter-->blur-->gaussian blur) and applied 5.1 pixels to match the blurred effect of the facial reflection in the desk and dropped the opacity till it looked convincing.
Final Touch
The last thing I did was to apply this texture by JoesSistah.... There are a lot of great textures there to choose from - Thanks Joe's Sistah! I imported the texture into the project and stretched it into place again with the transform tool and changed the blending mode to 'multiply'. From there you can scale back the opacity as you see fit. Another thing to play with is the colour. If you don't want that hue over your image, you can desaturate the texture first. I chose to leave the colour in and add a new layer filled with black using the paint bucket tool (G on your keyboard - you may have to switch tools if the gradient tool is selected). Then I switched that blending mode to 'hue' and lowered the opacity to 30%.
I also made a flattened copy of everything (select all layers and hit command alt shift E together) and changed that new layer's blending mode to 'multiply' and lowered the opacity to about 20% to add some darker intensity.
And for some final contrast you can use a "zero levels adjustment" - select a levels adjustment from the from the yin-yang icon (adjustment layer palette) and click ok without making any level adjustments at all. Then set the blend mode to 'soft light' ('overlay' for more effect) and scale the opacity back to taste (about 25% or so).
And that's it!
Let me know if you have any suggestions for improvement!
...and as always, give it a try and send me a link to your results!
It's fun to think up silly, ridiculous and otherwise impossible situations, don't cha think? We, of course, had to do something with the moustache just before shaving it off - and what better way to create ridiculous hilarity than with a trailer park/trailer trash 'stache and a vintage Herb Tarlek suit to get the mood just right?!
Taking the pictures
 |
| String used on a boom to dangle into my ear where the screwdriver was supposed to go |
Please excuse the fact that I have my shirt off here, but I wanted to have as much neck showing as possible to work with.
 |
| Areas masked off to reveal wall in the background and head on the desk |
Processing
In Photoshop I used the shirtless picture as the very bottom layer. Then I put the picture of me standing with the screwdriver on top of that bottom layer and masked away the areas that I wanted to show through to the shirtless guy (for more on masking, go to the Matrix post). You can see in the picture on the right what I've masked off - you'll notice there's an area in front of where my face is on the desk that I also masked because of the reflection on the surface of the desk. It's very easy to forget reflections and shadows!
Since I've masked away the head, there's a little bit of the collar we need to reconstruct. All you really have to do is make a selection around a little bit of the existing collar, paste it and move it into position. Then use the 'free transform' tool (command/control T) to bend it into shape. And because it should look like it's darker on the inside, I used an 'exposure' adjustment layer to bring the exposure down. Then I used a soft brush over the layer mask to mask away the top part, which should be the same brightness as the other side. Because the brush is set to 0% hardness, it applies a small gradient. Realistically there are many ways to do the collar, but this way got the job done easily.
 |
| Collar sampled and free transformed into position to look empty. |
Initially I wasn't sure what to use on the bottom of the neck, but after long deliberation and scrounging around at home, I decided to go with a steel ring.
 |
| "Connector" ring for my neck |
Anyway...import the ring (or whatever object) into the project and resize with the 'transform' tool (command/control T). Again the ring needs shadows - especially on the suit jacket that it looks very close to. If I were to do it all over again, honestly I would probably leave myself more room between the head and the standing me so's not to have to worry about shadows like that. What is important in any case is that reflection again as mentioned earlier. Since there's a little bit of a dull reflection of my face on the surface of the desk, it also has to show the ring as well. Even if it's a very small and hardly noticeable detail, it really has to be done. Your brain will recognize that it's there to help with the illusion even if your eye doesn't necessarily pick up on it.
I copied the ring layer (command/control J) and flipped it vertically (edit-->transform-->vertical flip) and moved it into position. I free transformed it to make it a little straighter and longer then masked away the part furthest from my neck with a large, soft black paint brush again to add that smooth gradient. I initially added a gradient to the layer mask but just had more control with the brush in the end. Then I applied a blur filter (filter-->blur-->gaussian blur) and applied 5.1 pixels to match the blurred effect of the facial reflection in the desk and dropped the opacity till it looked convincing.
 |
| Final version before applying the texture |
The last thing I did was to apply this texture by JoesSistah.... There are a lot of great textures there to choose from - Thanks Joe's Sistah! I imported the texture into the project and stretched it into place again with the transform tool and changed the blending mode to 'multiply'. From there you can scale back the opacity as you see fit. Another thing to play with is the colour. If you don't want that hue over your image, you can desaturate the texture first. I chose to leave the colour in and add a new layer filled with black using the paint bucket tool (G on your keyboard - you may have to switch tools if the gradient tool is selected). Then I switched that blending mode to 'hue' and lowered the opacity to 30%.
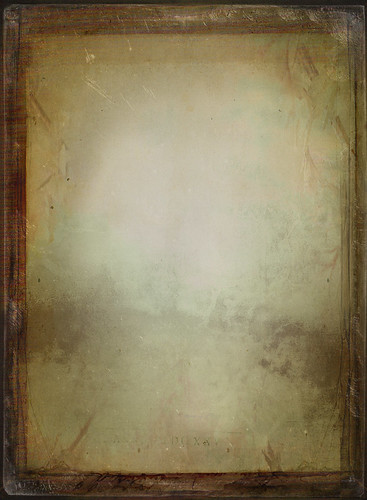 |
| Texture by JoesSistah... |
And for some final contrast you can use a "zero levels adjustment" - select a levels adjustment from the from the yin-yang icon (adjustment layer palette) and click ok without making any level adjustments at all. Then set the blend mode to 'soft light' ('overlay' for more effect) and scale the opacity back to taste (about 25% or so).
And that's it!
Let me know if you have any suggestions for improvement!
...and as always, give it a try and send me a link to your results!
3 comments:
Thanks for the tutorial. Seems like the set-up paid off in the end. And I really liked the texture technique that you applied, it really gives the image the extra 'pop'!
Very Nice :D
This is way too ambitious for me. Or maybe I'm just lazy! But you did an amazing job! I love that texture you added too. Really does 'finish' the image.
Post a Comment