For those who have asked for it - here are the basics, which can be applied to a hundred million different situations. Now...let's see if I can get the basic idea out without drawing too much attention to the flaws....
Really imperfections aren't so tragic, are they? After all the point here is to chronicle and share the learning journey as someone just trying to figure it out as they go, so...be gentle with me - I didn't even have any lights yet and I did the best I could with what I had at the time...just this past summer in fact.
So, many of you likely already know how to do these things, but for those of you who are new to this, here's the secret:


Taking the Pictures
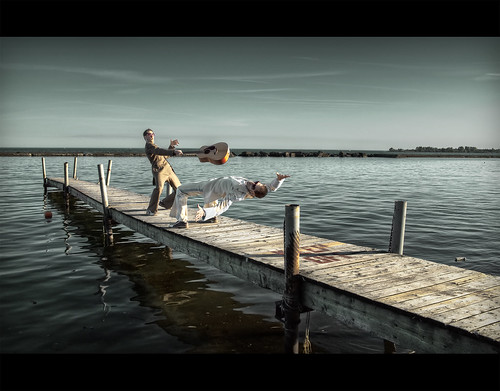
Some people have asked me, "how did you manage to photograph yourself falling backwards just at that moment in mid air¿?"
...now you know....
The first thing you'll want to do is get yourself a couple of silly (but snazzy) vintage suits and take a few pictures of yourself wildly and ridiculously swinging a guitar around.
You could just do it with the bottom two images, but I wanted the extra flexibility of having one frame of just the environment just in case during the processing at home.
I brought a suitcase with my costume changes and used the suitcase to lean on in the third picture. People actually stopped to take pictures of me like this - AANNDD while I was stripped down to my tighty whities between costumes! Be sure to let me know if you find those pictures somewhere on the net....
Anyway...meanwhile back on task: it's important to use a tripod (or something sturdy to put the camera on if you're improvising) and, if possible, a remote shutter release to keep the camera absolutely still in exactly the same position!
[You can get them here
Now load your handywork on to your computer!
Processing (Putting it all together!)
I use photoshop
You might find, like I did, that the remote shutter release wasn't actually especially useful. So why did I just recommend it? Assuming you're not using your tripod in the water directly on Lake Ontario, you should really notice the difference!
But what happens if your pictures don't align themselves perfectly? No problem - let photoshop do it for you. Put the pictures your going to use on separate layers in the same canvass. Then go to 'Edit' --> 'Auto-align layers'. A dialogue box will pop up - choose 'Auto' then go get yourself something to drink while it's doing its thing.
 |
| Auto-align layers |
Now you're going to add a layer mask (or vector mask) to mask out the parts you don't want to show in your image. The order of your layers doesn't even really matter here. You're just masking one layer to show through to the information you want to show from the layer below:
 |
| Click the layer to make it active. Then hit the "vector mask" icon where the arrow's pointing toward the bottom and mask through to the next layer |
It also helps to lower the opacity of your working layer so that you can also see the one that you're exposing from underneath:
 |
| Lower the opacity to help you see what the heck you're doing |
As long as you only paint black over the figure from the image in the lower layer and keep the suitcase area white, you'll save yourself the trouble (and inevitable pain) of having to photograph yourself falling in mid air to produce the effect your after.
 |
| Paint black over areas you want to show through (like the dude in the cream and blue fun-fur disco suit here) leaving areas white that will remain hidden (like the vintage suitcase) |
And that's really the basic effect! I wanted to shoot from the other side of the dock so that the fast setting sun would illuminate more of the figures in the scene except that a couple plonked down on the other dock behind it just then to enjoy a romantic and nutritious McDonald's dinner on the water, which...would have been in the shot...making my efforts significantly less dramatic....
Instead, I (with the help of my lovely assistant) had to deal with photographing the shady side of the action without any reflectors or lights for fill and lighten things up later in photoshop.
At the end of the day, it was just for fun and that's exactly what it was - fun plus...another learning experience!
To complete the look, I slapped on a few different filters later on in photoshop, doubled up on layers tweaked in the camera raw sub-program of photoshop and ran some noise reduction and sharpening after playing with the colours a little, curves, levels, etc....
If you have any questions, let me know and I'll do my best to answer each one.
Here's an earlier attempt using the same idea:
 |
| Same lovely assistant who was behind the scenes for the Matrix project above |

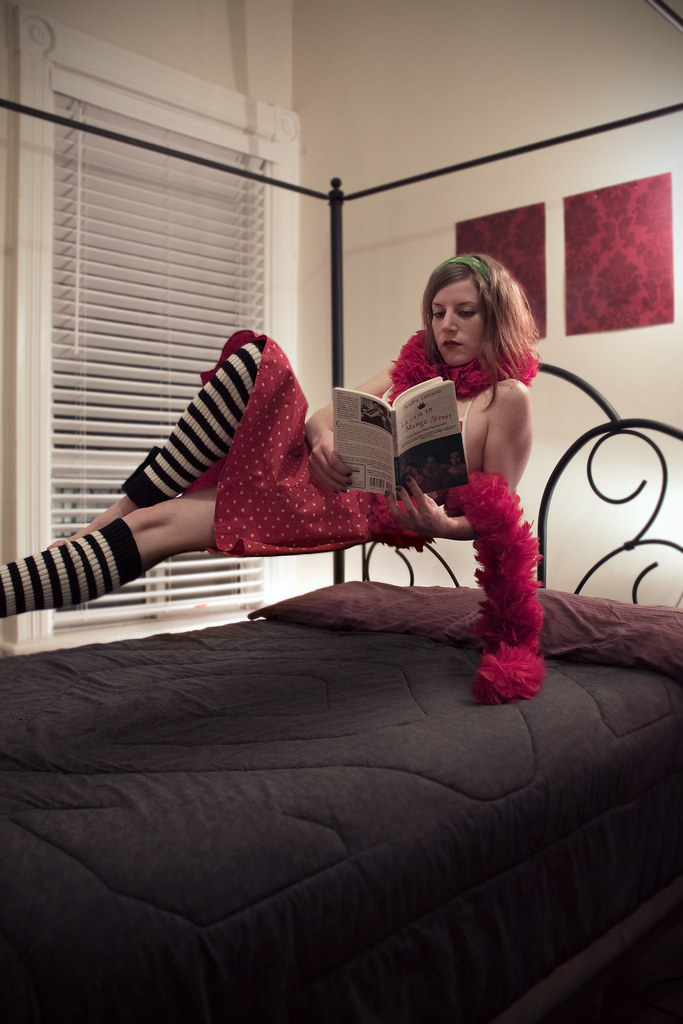
Then take your girlfriend, convince her to put on a boa and try and balance precariously on a wobbly coffee table like this:
Actually she makes it look quite easy, but really it was fairly unstable, so...careful!
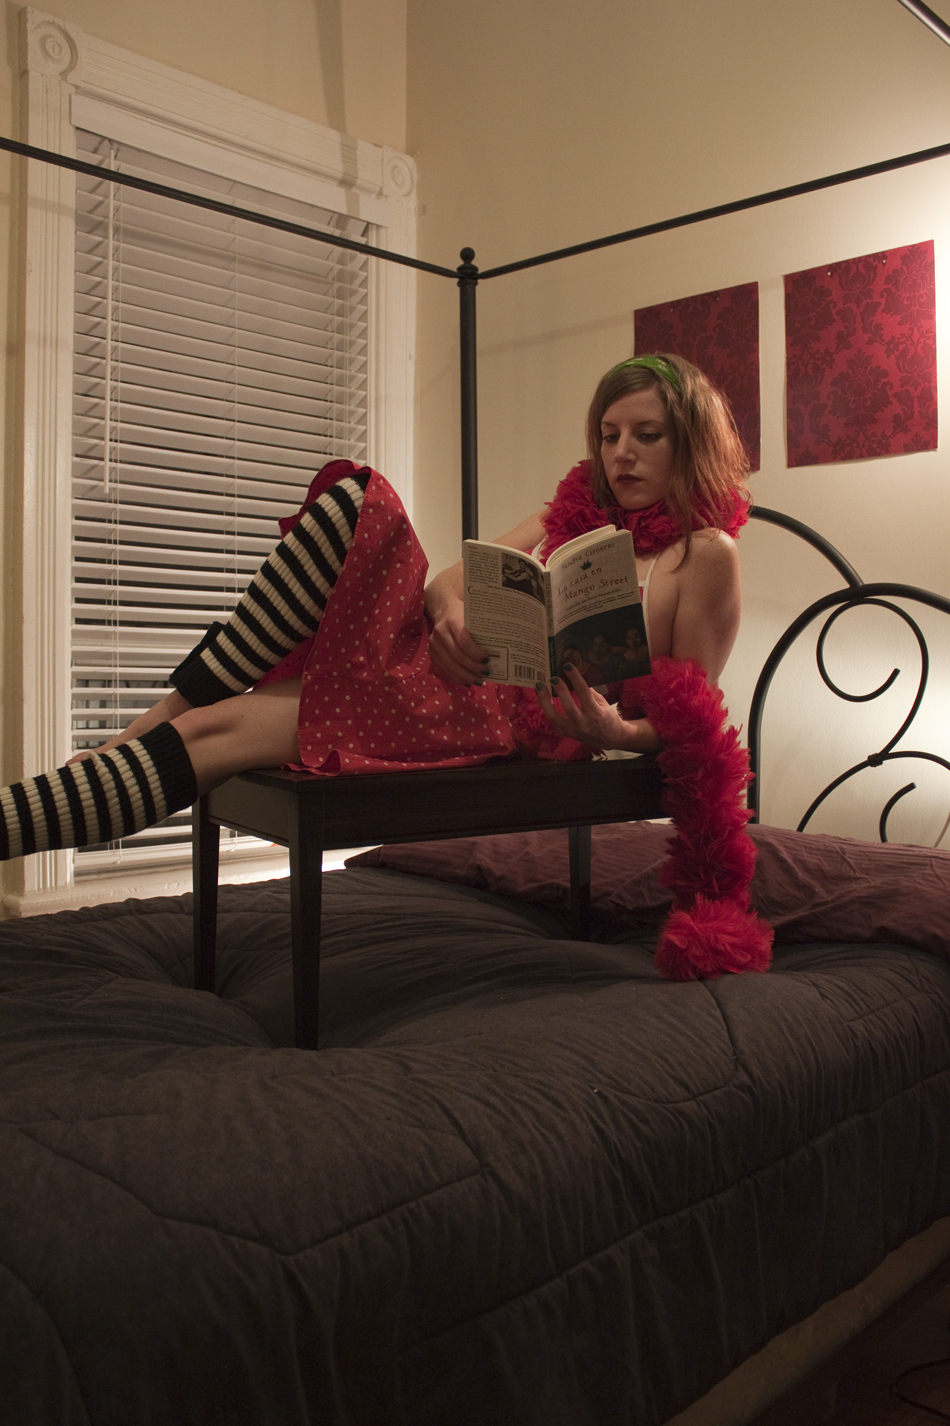
Don't forget about shadows. If there isn't one, you might have to create one so that the subject somehow interacts optically with the environment making the scene believable. Otherwise you end up with this:
 |
| Without shadow = less convincing |
 |
| With shadow = much better ¿no? |
...could've used some real lights though....
Have fun experimenting and thanks for reading! And send me your results!
....
Oops! Have I missed something?! Help share resources by adding them with a short description in the comments section or write me and I'll make sure it gets posted!
8 comments:
Cool stuff!! I like it a lot!
Really simple and great tutorial ;)
Thanks.
That is so cool! I need to try it. Thank you for such a detailed tutorial!
VicPhotos
Glad you like it - thanks for the comments guys....
by the way mr. shayne, can u make a tutorial on how to achieve the color in your 1st photo here? O_o. I kinda like such photo with a "movie -effect". I've been searching a tutorial about that, unfortunately, found nothing. :D
-cheers, glenn
Hey Glenn,
Thanks for stopping by again - sure I can add that to the list of future posts. Some of it is a blend between HDR and this post. More specifics coming soon!
Hi, I really like your work, but how did you add the shadow please ?
Hi Anonymous and Happy New Year! That was a long time ago, but I think I just painted the shadow with a large, soft paint brush on a low opacity. Because it's over a dark quilt, it's very easy. If you're doing a shadow that draws more attention to itself, do it in stages so the edges aren't as dark, although really there are so many situations depending on where the light source is relative to the subject and how close the subject is to the surface with the shadow, hard light, soft light, etc. Also play with blend modes: start with multiply, but you can also try overlay, soft light, etc. Good luck! Post a link to the final image! All the best....
Post a Comment